JUMO LOGOSCREEN nt
Is it possible to display the recorder screen online via Ethernet and the web browser on the PC?
The standard web server function of JUMO LOGOSCREEN nt 706581 allows online display of the recorder screen for measurement data visualization.
You can select and change the view on the PC regardless of the current display on the paperless recorder.
For security reasons, configuration changes can only be made via the setup program or directly on the recorder.
A brief introduction to web servers using the JUMO LOGOSCREEN nt and a PC within a company network as examples:
1) Microsoft Internet Explorer is required as the web browser.
2) To display SVG (Scalable Vector Graphics) images, which are used in the web server, correctly the web browser needs a plug-in such as the SVG Viewer from Adobe (http://www.adobe.com/svg)
3) Establish a direct Ethernet connection between the PC and JUMO LOGOSCREEN nt as described in the previous article.
4) If the current IP address of the JUMO LOGOSREEN nt is now entered in Internet Explorer, a window opens to query the user name and password for logging into JUMO LOGOSCREEN nt.
(Factory setting: user = Master, password = 9200)
Online visualization is then established. Here you can switch between different views.
My USB flash drive is not supported by JUMO LOGOSCCREEN nt!
Once the USB flash drive is inserted in the recorder the following message appears:
Answer:
JUMO LOGOSCREEN nt does not work with all USB flash drives that are available on the market.
Reliable functioning is only guaranteed when using USB flash drives that are purchased from JUMO.
What is Eco mode? How does Eco mode work?
The aim in Eco mode is to keep the number of saved measured values as low as possible while still clearly displaying the signal path.
The number of stored measured values depends on the dynamics of the measurement signal.
If the measurement signal is very stable the measured values are only stored at relatively large intervals. This is specified by "Min. Storage cycle" in standard operation of the group configuration.
If the measured value deviates from the defined "Tolerance band" for longer than set under "Storage cycle", additional measured values are stored. The reference point for the tolerance band is always the last stored measured value.
If the focus is less on the detailed signal path and more on monitoring limits, the number of stored measured values can also be reduced by storing the "Min/Max values" in conjunction with a longer memory cycle, thereby saving storage space and, if necessary, transmission time.
More detailed information on "Eco mode” can be found in the operating manual B 70.6581.0 in chapter 2.8.2.
What options does the >Flow Rate Quantity< function offer?
Information on the "Flow Rate Quantity B" function on the JUMO LOGOSCREEN nt
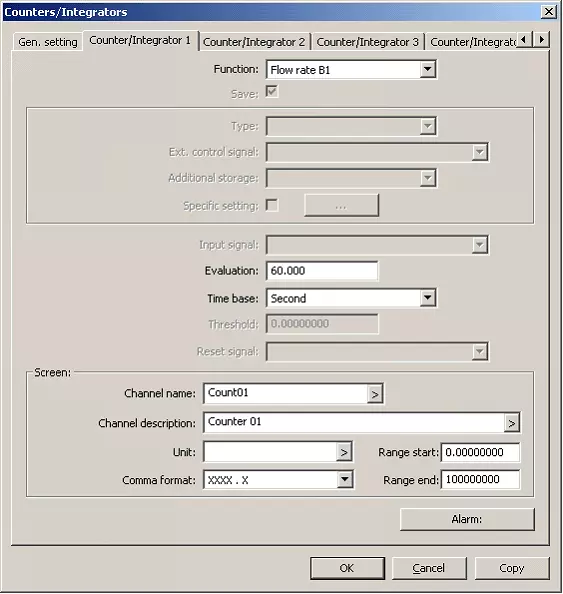
The "Flow Rate Quantity Bx" function is located in the "Counters/integrators" menu.
Example:

In addition to recording the current flow or the flow velocity, a speed indicator or a display for quantities per time unit can also be implemented.
The calculated value can also be included as a line display in a group via the math option and thereby displayed next to analog input signals.
At one pulse per revolution, the speed in rpm could be displayed and stored as a line (= like an analog signal) in the following manner:
How can JUMO LOGOSCREEN nt with LON modules be expanded by external analog and binary inputs?
LON to LOGOSCREEN nt
There are two possible variants,
-
Polling the communication module
Disadvantage:
Advantage:
- Fast polling cycles
- Max. 16 external inputs possible.
- Bindings also have to be created in the iTOOL project.
- Polling the input modules
Advantage:
- Max. 24 external inputs possible.
- No additional bindings have to be created in the iTOOL project.
Disadvantage:
- Slow polling cycles
ITOOL_Project for polling the communication module
With iTOOL, a project is created with the Modbus gateway and the input modules.
In the example here, with 2 x 8-fold input modules.
Bindings must be created in the iTOOL project for polling the communication module.
Analog input module 1 is preferably connected to Real_In01 – Real_In08.
Clear sorting is obtained by placing 00 in front of the name for the bindings.
E.g. in001 (shown in the project example).
The second module corresponds to Real_In09 – Real_In16.
Configuring Logoscreen nt
To poll the communication module and the input modules, it is important to know the Modbus slave address.
This is permanently assigned in the background when creating the iTOOL project.
A list of the requisite addresses is displayed in the print preview.
To see this, proceed as follows. In the Network menu, select Compile....
Confirm the note from iTOOL with OK and close the window with Close.
In the Project menu, select Print-Preview... and check Module list. Uncheck the other options and confirm with OK.
You will then see a list of the modules.
In the Address column, you will see the associated internal slave addresses (red frame) of the modules.

Activating the Modbus master configuration in the Setup program

The slave address found in Print Preview is now used as the instrument address for the Setup program entry in the Modbus master configuration. The Modbus address can be found in the system manual (sh70.4040d.pdf).
The following Modbus address table applies for polling the communication module.
(sh70.4040d.pdf page 51)
Number of Values is the input option for polling successive ModBus addresses; with the communication module, it makes sense to enter 16 values here.
The following table applies to polling the 8-fold modules.
(sh70.4040d.pdf page 61 )
The following table applies to polling the 4-fold modules.
(sh70.4040d.pdf page 45 )

Number of Values is the input option for polling successive ModBus addresses, in the example here, 8 values for the 4-fold module corresponds to 4 values.
Tabs 2 - 8 are then inactive.

How can the Ethernet interface be used or tested independently of a network by direct connection with a PC or notebook?
Explanation using the example of JUMO LOGOSCREEN nt and a PC or notebook with Windows XP:
The example is based on the factory default settings for the Ethernet interface.
The following screenshots show where the settings for the Ethernet interface on the JUMO LOGOSCREEN nt can be checked and, if necessary, changed.

DHCP must bei switched off. The IP adress and subnet mask of JUMO LOGOSCREEN nt and the PC must be coordinated. The following settings must be changed on the PC or notebook for the direct connection via Ethernet:


The right mouse button on LAN connection opens the displayed menu with "Properties".

Under "Properties" you will usually find the following default setting:

The following settings must be changed her for the direct connection between PC and JUMO LOGOSCREEN nt:

Connection & wiring:
A crossover cable (= patch cable with crossed connections) or a normal patch cable + crossover adapter with RJ45 connector is normally required for the direct Ethernet connection between PC and JUMO LOGOSCREEN nt.
Newer notebooks are more often able to adapt to the direct connection without a crossover cable. However, with crossover cables you are always on the safe side.
How can I change the device language for JUMO LOGOSCREEN nt?
JUMO LOGOSCREEN nt stores 2 device languages (by default these are GERMAN and ENGLISH). You can switch between these 2 languages on the device.
Menu on JUMO LOGOSCREEN nt:
Using the setup program and the "Sort language" function you can specify which language is to be transferred to the JUMO LOGOSCREEN nt together with the other configuration data as national language 1 and national language 2.
JUMO LOGOSCREEN nt can later switch between the 2 languages that are defined in the setup program as national language 1 and national language 2.
Only national languages 1 and 2 are transferred with the setup data into JUMO LOGOSCREEN nt.
Menu in the setup:
How to determine for which time period the internal measurement data memory is sufficient?
How can batch texts be entered and edited via PC keyboard?
Batch texts can be entered and edited via the setup program in online mode.
Enter batch texts for the current batch via the setup program using the PC keyboard.
Online – establish a connection to JUMO LOGOSCREEN nt and select "Write interface texts" from the "Tools" menu.
Edit batch text on the PC and send to JUMO LOGOSCREEN nt

Why is it not possible to display measurement data on the PC via the PCA3000 evaluation software even though no error occurred when loading the measurement data?
Why does the measured value view on the screen of the JUMO LOGOSCREEN nt disappear after switching to a different view?
View in the PCA3000 evaluation software:
Answer:
To enable JUMO LOGOSCREEN nt to store measured values during normal operation, the "Status" parameter in the respective group must be changed from the default "Display only" to "Display, Save".
In addition, the memory status for normal operation must remain set to "ON".


Where can the time range shown on JUMO LOGOSCREEN nt screen be set?
The time between 2 grid lines results from the current memory cycle multiplied by 60.
Examples:
With a set memory cycle of 0 seconds the JUMO LOGOSCCREEN nt works with 125 milliseconds. This results in 7.5 seconds per grid.
With a memory cycle of 10 seconds, 10 minutes lie between 2 grid lines. Approximately 24 minutes are displayed on the screen.
A display range independent of the actual memory cycle can be achieved as follows:
- The corresponding channels are assigned to 2 groups at the same time
- One group is intended for storage, the other group for screen display.
- The group configurations therefore differ only with regard to measurement data storage (>Parameter - "Status" - "Display only") and storage cycle.
Where and how can JUMO LOGOSCREEN nt passwords and rights be managed?
Settings are possible in the ONLINE dialog box or via CF card and can only be accessed via the menu item "Tools" in the following way with the setup program:

Selection for data transmission:
Default setting of the default rights:
- ${title}${badge}


